

[amazon_link asins=’B01JB5GV0W,B01853OBPI,B01LYR7C51,B01FM33PEW,B01JPHLSD6,B01C3HEQZC,B00J0GMMP6,B00MEZEEJ2,B00J0ECR5I,B00MEZEFVO,B00J0GO8I0,B00J0EE1D4,B00M0CS73S’ template=’ProductCarousel’ store=’printer3d-20′ marketplace=’US’ link_id=’f0a5b962-a3aa-11e7-b35f-674756221599′]
> FIRMWARE LIST FOR WANHAO D6 & MAKER ULTIMATE
Summary
- Introduction
- How to flash this new firmware
- Methodn °1 (expert)
- Method n°2 (easy)
- IMPORTANT : To be realized immediately after the flash
- The Officials links
- Frequently Asked Questions (FAQ)
New LCD Panel after the Marlin 1.1 Firmware update :
Introduction
Marlin is an open-source firmware, It is constantly evolving, while the official Wanhao firmware also based on Marlin has not evolved since May 28, 2016 (v3.01). Marlin brings many advantages to the Reprap printers as it is to the Wanhao Duplicator 6, it offers you the possibility to compile your own versions and improvements specific to your needs (increase the maximum temperature of the extruder, add an automatic leveling sensor, Better interpretation of the GCodes.
This operation takes about 10 minutes before you can start your first print. The flash process takes only 2 to 3 minutes with method n°2 (firmware injection in .hex format via USB cable between PC and D6). More 3-4 minutes to properly level.
At first if you do not know Marlin I invite you to visit the official website here: http://marlinfw.org
How to flash this firmware?
In this document I show you two options: one using the IDE Arduino (Integrated Development Environment) and another using a program named Xloader. 1 is perfect if you have the original source code and you want to make specific changes in your firmware This method is reserved for advanced users The method # 2 with the Xloader application is very easy to use, Use if you have the .hex file (it is simply the compiled (public) version of the source code
Method # 1
For uploading firmware (machine control settings) you need to install Arduino software. You can download the Arduino IDE from: https://www.arduino.cc/en/Main/Software
You want the latest version (this version of Marlin 1.1rc8 for D6 was compiled with version 1.8.1) but any version past 1.8 will be fine. Note, the Arduino IDE is a pretty large file, so it can take a while to download. I also recommend the Installer version as it will associate the Marlin.ino file with the Arduino IDE, allowing you to double click on that file to launch the whole Marlin project into the Arduino IDE.
NOTE: If you are using something other than Windows, the Arduino IDE works for Apple Mac, as well as other Linux distributions (including the Raspberry Pi). This guide is targeted to the Windows platform.
If you have not already installed the Arduino IDE, do that now.
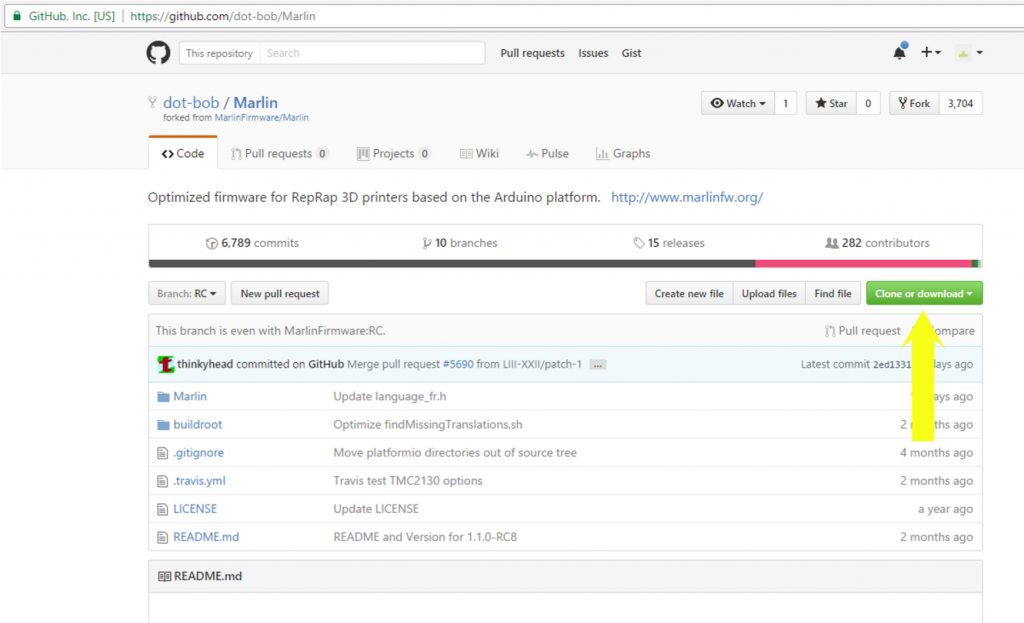
You will also need to download the Marlin D6 port from Rob Mendon’s Github (an online repository for source code files) at the following:
https://github.com/dot-bob/Marlin-Duplicator-6/tree/1.1.x
Download the project by selecting “Clone or Download” button in the upper left hand of the window. When pressed, it will give you an option to Clone With HTTP or “Download Zip”. Press “Download Zip” and save the file.
After it is downloaded, extract the Marlin folder to where you can find it. Open the folder and locate the file “Marlin.ino”. Double click this file and the Arduino IDE will open.
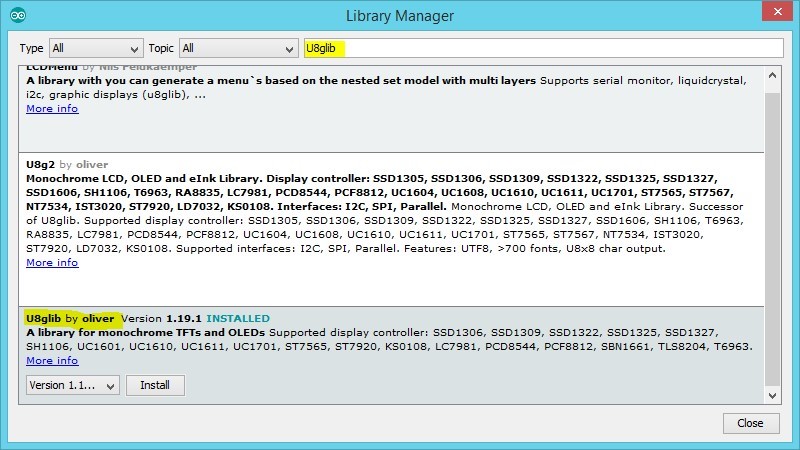
Now before we can build Marlin, we needs some addition files called libraries. These are very easy to install, as the Arduino IDE has a function to search and download libraries.
NOTE: if you try to build the project without downloading the necessary libraries, you will get compilation errors.
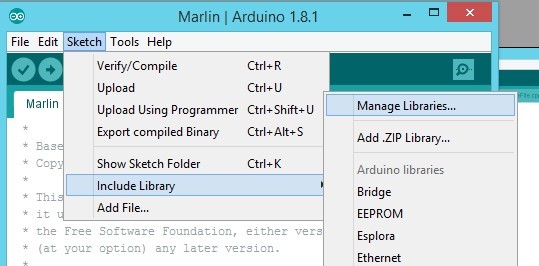
From the Arduino IDE menu bar, click Sketch → Include Library → Manage libraries.
Dans Arduino IDE, depuis la barre de menu, cliquez sur “Sketch” → Include Library → Manage libraries.
In the library manager scroll down to U8glib and click install.
Now that the Arduino IDE is all set to compile our Marlin source code, we need to make sure the IDE can talk to the printer. Make sure the printer is plugged in and turned on. Also make sure the USB cable is connected from the Windows PC to the D6.
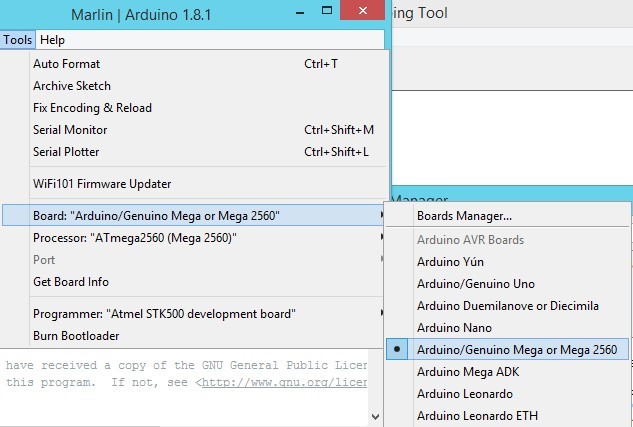
You need to tell the IDE that you have an Arduino Mega 2560.
From the Arduino IDE menu bar, click Tools → Board → Mega 2560.
You now need to tell it which COM port your printer is connected to. The IDE is pretty good at listing only valid COM ports. If nothing else is connected to your Windows PC (COM port wise) it will be the only COM port listed. Select the correct COM port. If you are unsure, select the “Get board info” and the IDE will ask the 3D printer what type of Arduino board it has. This is a pretty good way of knowing if your printer is talking to your computer. If you have multiple COM ports to choose from, and the “Get board info” does not return valid information, then you have not selected the correct COM port. Reselect and try again.
Also make sure all other programs that can communicate with the 3d printer like Pronterface, Repetier or S3D are not running.
Press the “Build and Upload” button. It will take about 5 minutes (depending on speed of your Windows PC) to build all the code and upload the new firmware to your printer. When it is done building your printer will restart and the display will now greet you with this:
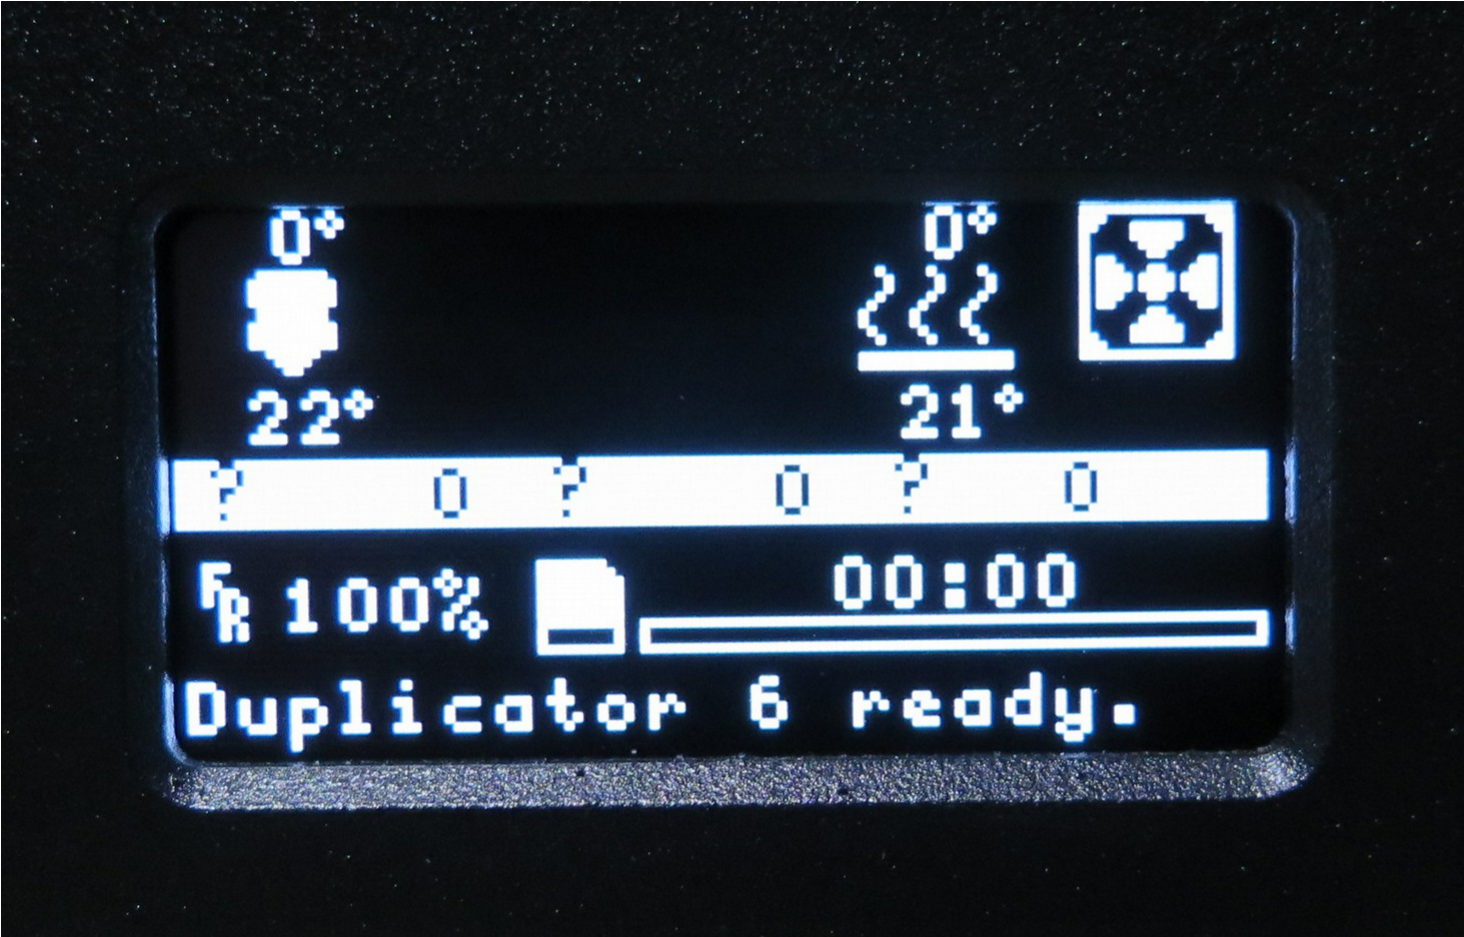
Congratulations! Your printer is now updated with the latest and greatest Marlin firmware.
[amazon_link asins=’B01JB5GV0W,B01853OBPI,B01LYR7C51,B01FM33PEW,B01JPHLSD6,B01C3HEQZC,B00J0GMMP6,B00MEZEEJ2,B00J0ECR5I,B00MEZEFVO,B00J0GO8I0,B00J0EE1D4,B00M0CS73S’ template=’ProductCarousel’ store=’printer3d-20′ marketplace=’US’ link_id=’f0a5b962-a3aa-11e7-b35f-674756221599′]
Method # 2:
How to Install if you only have the HEX file.
Download compiled firmware (.hex) Version 1.1.0-RC8 02-27-17 Version 5.0 (RM)
Open the folder and locate the file “Firmware Wanhao Duplicator 6 Marlin 1.1.0-RC8 Version 5.hex”. Note, as the firmware is updated, the file name may change, but it will always end in .HEX
Included in the folder is a program called Xloader. This is the program that we will use to “flash” (upload the hex file to the 3D printer).
If Xloader is not in the folder or you need to download the latest version, it can be found here: http://russemotto.com/xloader/
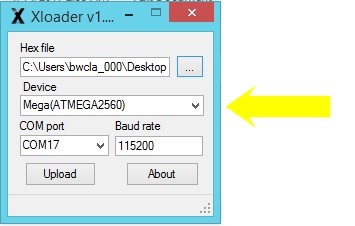
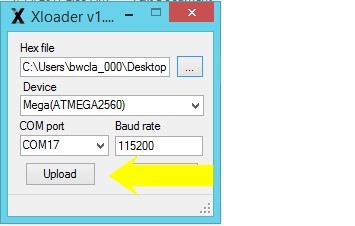
ith your D6 machine powered up and connected to your Windows PC, we are going to flash the new firmware. There is nothing to install, so just extract the folder where it is easy to find (Desktop is a good starting place). Open the folder and look for Xloader.EXE. Double click on the icon and you should be greeted with this window:
We need to load the “Firmware Wanhao Duplicator 6 Marlin 1.1.0-RC8 Version 5.hex” file. Press the “…” button to open an explorer window and locate the “Duplicator 6 Marlin 1.1.0-RC8 Version 4.hex” file.
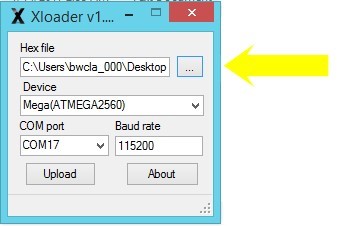
We now need to select “Mega(ATMEGA2560)”
Finally, we need to select the correct COM port that the D6 is on. Usually, Xloader will only show you
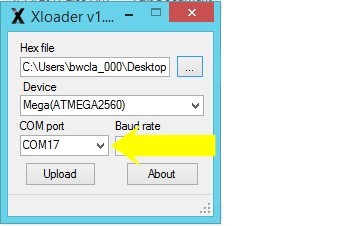
Valid COM port. And finally, press Upload.
If all goes well, your machine will make a “thunk” noise and then it will reboot. The upload should take about 3 minutes. If it takes more than 5 minutes, Xloader was unable to talk to the printer. Verify that the COM port is correct and that your printer is powered on. Readjust the COM port and try again.
Your printer will reboot and you should be greeted by this screen:
Congratulations! Your printer is now updated with the latest and greatest Marlin firmware.
Bruce Clark – Documentation
Rob Mendon – Firmware porting to Wanhao D6
—
(Form file created by Bruce Clark).
IMPORTANT: To be realized immediately after the flash
After the Marlin flash for the Wanhao Duplicator 6 printer, you must:
- Restart your printer
- Restore the firmware (Main menu -> Control -> Restore failsafe).
- Save the new settings (Main menu -> Control -> Store Memory).
- Leveling the Printer
Official links to install the Marlin 1.1 firmware on the Wanhao Duplicator 6 printer
![]()
The source code, the compilation method, and the detailed installation procedure can be found here:
https://github.com/dot-bob/Marlin-Duplicator-6/tree/1.1.x
Method # 2 (easy). If you want to simply flash your Duplicator 6 your D6 without using the application ARDIUNO:
Download compiled firmware (.hex) Version 1.1.0-RC8 02-27-17 Version 5.0 (RM)
All instructions can be found on the Github, or higher in this post: Method # 1 and Method # 2.
Link to probe holder for auto-leveling
http://www.thingiverse.com/thing:2081168
Frequently Asked Questions (FAQ):
Quelles sont les différences et amélioration par rapport au firmware d’origine ?
Elles sont très nombreuses, je vous invite à lire le changelog général de Marlin
- Il y a en particulier (dans le désordre), un respect du temps d’impression par rapport au temps annoncé via le logiciel (slicer) Simplifiy3D ou Cura.
- Le panneau d’information LCD complètement revu et amélioré avec un accès aux principales fonctionnalités beaucoup plus ergonomique.
- Un nivellement amélioré avec plus de points de vérification
- La possibilité d’ajouter une sonde pour le nivellement automatique (compatible avec le buildtrack ou un plateau en verre (ou miroir) (utiliser une sonde capacitive pour le verre)
Puis-je revenir re-installer le firmware d’origine fourni par Wanhao ?
Oui, il suffit de simple reflasher le firmware officel de Wanhao v3.0.1 au format .hex disponible sur le site
Mon (slicer) logiciel de Tranchage pour Impression 3D open-source est-il compatible ?
Oui, la plupart des slicers sont compatibles. Marlin pour Wanhao Duplicator 6 a été testé avec Simplify3D 3.1.1 et Cura. Il faudra juste penser à remplacer les GCode de début et fin fourni avec le firmware.
Simplify3D (S3D) est-il compatible avec Marlin pour l’imprimante Wanhao Duplicator 6 ?
Oui, Simplify3D est compatible, il faudra juste penser à remplacer les GCode de début et fin fourni avec le nouveau firmware.
Ma première impression est ratée (alors que tout fonctionnait parfaitement avec le firmware d’origine.
Plusieurs causes sont possibles : mauvais nivellement, données corrompues etc…
Dans mon cas, bizarrement j’ai du refaire complément le nivellement, j’ai dévissé les visses sont le plateau au maximum et réglé le buttoir d’arrêt de l’axe Z (elle est situées à gauche de la vis sans fin de l’axe Z).
What should I buy / use a auto-leveling probe with a glass plate ? (another probe than for buildtrack)
Add optionally an induction probe for auto-leveling
- Print design created by B.Clark https://www.thingiverse.com/thing:2081168Link to recommanded 12mm induction probe: http://amzn.to/2ygEH6R
Link to 18mm induction probe (reduce print surface): http://amzn.to/2x6W7h8 - A positive voltage regulator
http://www.ebay.fr/itm/192030944610?_trksid=p2060353.m2749.l2649&ssPageName=STRK%3AMEBIDX%3AIT - Connectors
http://www.ebay.fr/itm/172475824109?_trksid=p2060353.m2749.l2649&var=471325870512&ssPageName=STRK%3AMEBIDX%3AIT Thnaks to Nikos Diers for this link !


Marlin provides two dummy sensors for testing purposes. Set their constant temperature readings here. Enable this option to use sensor 1 as a redundant sensor for sensor 0. This is an advanced way to protect against temp sensor failure. If the temperature difference between sensors exceeds
somebody Please HELP!!!!!
I have now been unsuccessfully attempting to install new Marlin firmware on my Monoprice select Utimate lllP printer for like a day now using the Arduino IDE method!!
initially the problem was when attempting to compile it would flash “error: compilation terminated” due to the lack of library file “U8glib” which I could find in the “Manage Libraries” function but when clicking download, it failed to update library with the file. I also tried the zip file method & that too failed miserably. I finally managed to click & drag the file in, tried to once again compile but then error for a lack of library file “utility/u8g.h”….!!!!!!!
Please someone I would appreciate any expertise in this as i’m at my wits end…..
So….update, to help any others out that may have been experiencing the same problem as I was in the last post….
PROBLEM RESOLVED!!!
I only have 2 words…WINDOWS 10 & ANTIVURUS PROTECTION!!
Apparently my Bitfinder malware protection was the culprit behind preventing this Arduino File from completely downloading all necessary libraries in their entirety. What a pain, had to disable it temporarily to allow the virus that is Arduino 2 compile. All good now, thx.
Yes, Antivirus may cause some stupid problems…